Sunday, April 29, 2012

Rafters!

Another beautiful and sunny day here in the land of shed-building.

Mid-week, Jack picked up 8 feet of 6x6 cedar beam, as the roof calls for a cedar hub, where the rafters tie on at the center of the roof.  The table saw will only cut about 3 1/4 inches, so it takes multiple passes and turns to cut this beam.

We cut a 8 1/2 inch block off one end, and after some jury rigging, multiple resets/repasses, and generally trial and error, we got a nearly perfect 4" octogon, as called for in the spec.

Heres the octogon hub, and the rest of the beam from which it was cut:


On Saturday, Jack and I cut and raised the 8 main rafters.

To start out, we attached the 3 corner rafters to the hub, on the ground. (those that go from the hub to the "square" corners, there are 3 of them).  then we lifted that assembly up over the front wall and more or less walked the assembly onto the double top plate, where we anchored the main rafters to the top plates at the corners.  that gave a pretty well supported tripod, onto which it wasn't real difficult to attach the front rafter and the 4 center rafters.

Here are Jack and I at work. The 3 hub rafters are on, and the front rafter (above the door opening) is on.  We have 1 center rafter on, and are working on the second.  Everything is going together perfectly.


Here's Jack, thinking really hard about something.  If you zoom in to where the rafters meet the corners, you can see the birdsmouth I talked about last post. (where i mistakenly called it a birdsbeak).


 Jack has figured out where that hub went he was so proud of earlier in the week!


The Hub.  It really did turn out nice!

Here what we mostly see, is that the shed Jack and I are building, makes the neighbors shed look like a poor excuse for an outbuilding.

Examining the rafters, we need to make a couple minor adjustments to a couple rafters that are not sitting straight, they are slightly cocked.  The rafters are screwed to the hub and to the double top plate at the top of the walls with 3" screws, so it should be simple to back the screws out of one rafter at a time, and make minor adjustments.

Originally, Jack's wife wasn't too hot on us building a shed, believing our lack of experience would result in something substandard.  She wanted us to go to Lowe's and buy one.

Now, however, she thinks we should hang a ceiling fan, porch lights, etc. and put wicker seating in it!  She does not understand why we are making the doors.  Everything else here has been cut from  raw lumber.  We made the windows (inner & outer boxes, and the muttins).  Why not make the door also?  Jack and I recently visited WoodCrafters and saw the perfect set of router bits for making panel doors.  Should be fun!


Sunday, April 22, 2012

Walls Are Up

The weather was remarkably good again today, lows in the 50s, highs in the 80s, clear and sunny with a light breeze.

Jack and I finished the siding up on the 4th (of 5) walls this morning, and stood the walls up.  A double topheader ties the walls together at the top, and will eventually support the roof rafters.

It went together flawlessly, which might say more for the architect than it does for us, but here's some new photos.


Here's the 4th (of 5) walls, finished.


There are two ten-foot walls, this is the "inner" 10 foot wall, it ends 3.5 inches short of the back corner, against the other back wall that runs all the way to the corner.  we've staged it here in preparation for raising it up.


Ok, this is the first wall up.  its braced on the near edge with a piece of 2x6, as there are only 2 of us and we dont have quite enough hands to hold it all up while someone nails.


Jack, on a ladder behind the shed, is judging the fit of the two 10 foot walls coming together at the back corner.

Here, you can see the double top header attached to the "inner" back wall.  the double top header runs the full 10 feet, overlapping the ends of the back wall and the short wall you see here, tying them together.


all 5 walls up, with double top headers applied.  The front wall, where the double doors will go, is kinda hard to see in this photo.  it has no siding on it yet, so it kinda blends into the studs at the back walls.


Next up is the roof.  its a 5 point roof, having 3 hip joists, 4 center joists, and a stack of jack joists, all with various bevels and cuts.  the joists all have a birdsbeak that sits on the double top header.  We will be needing the jigsaw to cut some of that, and mine needs new blades so we stopped here for the day.

Well, we sorta stopped.  We did do some measuring, and drew the cut lines on one of the hip runners.  We also need a 6x6 piece of lumber from which we can cut the hub for the center of the roof.

Overall, a great day.

Back to work on the Shed

After a bout of poor weather and illness, Jack and I are back on the shed.  Put siding on 2 walls yesterday, and discussed what we will do with the 5th wall ( the one with the double doors ).

so, here's some photos:

As I mentioned in the last Shed post, Jack is making windows.  here's the outer and inner boxes for one of the windows.  Jack debated whether to hinge them so they would open or just screw the inner box into the outer box as a fixed window.  I think I have him talked into hinges.  The window here is just placed in the outer box for the photo.


One of the 5' sidewalls, with siding on.  for the window, we used the skillsaw to cut the siding exactly to the edge of the framing for the window, and used a craftsman 18.9v sawsall to clean up the corners, as the skill would have cut part of the studs if we ran it all the way to the corner.


The "other" back wall.  here the two 10' back walls have been sided.  we are close to putting walls up.  Maybe Sunday.

The project space, walls and such all strewn about.  We have one 5' wall to put siding on, then we stand up the walls and attach them to each other with headerboards, and attach them to the shed foundation.


Monday, April 2, 2012

Coffeegoddess' Bathroom remodel

One of the bathrooms in the doublewide was aging badly.  The plumbing all worked, but the self-stick linoleum floor was coming up from the decking, and the printed wallboard was... lets say unattractive.

So, for Christmas 2010 I gave Coffeegoddess a bathroom remodel.  Like all my unfinished projects, this one languished for a year before I got it done, but here are some works in progress.  most of this work was done in November 2011, trying to get ready for thanksgiving last year.

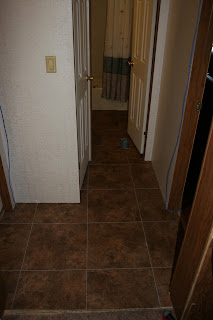
Here's a new floor going in, including the bathroom, the hallway, and the linen closet.  The flooring material is a self-stick linoleum, a "premium" material.  It's pretty thick, and takes a 1/8" grout-line.  The material surface has a stone or tile look to it.

The centerline run, to keep things straight


Bathroom floor is complete.  once the grout sets we will remount the old toilet. 

That white splotch on the wall was behind the toilet tank, I could not reach it with the brush when I was painting. 

In this photo, next to the doorjamb, you can see the paint color for the bathroom is a light beige, and the original printed wallboard is this vertical stripe of leaves and flowers.  Glad that is gone. 


I removed most of the trim pieces from the doorways as we will be painting this hallway area, and the trim pieces were in the way of the flooring anyway. 


The linoleum will meet the laminate floor in this doorway. I need a threshold strip to cover the gap, as there is a difference in height in the two materials.  Same thing where the linoleum will abut the carpet, I suppose.


Jack's Shed

My friend Jack decided he needed a shed.  So, we are building one.

He bought the plans online for a 5-sided shed, which is 10x10, but with 1 corner cut off at a 45 degree angle.  It has an 8-point roof also.  And 2 windows, and a double door.  And planter boxes.  Fun!

The plans have a material list, which McCoys was happy to fill and deliver to Jack's garage.

So far, we have spent several weekends getting this shed going.  I have a tablesaw, Jack bought a router, and we both have an assortment of drills, skill saws, levels, T-squares etc. we are using.

This is 6 weekends or so of progress.  It took us a couple weekends to get the cinderblock foundation laid due in part to weather.  The joists are 2x6, they sit on skids that in turn rest on the cinderblocks.  3/4" plywood is used for the decking, and 2x4s are used for the studs/wall assembly.  Cedar siding for the siding, and composite board and shingles for the roof.

The wall height is 72".  we could not find a handy door in our price range, so we are going to make one.  We've already started manufacturing the 2 windows.

Some photos follow

The shed is 5-sided, basically a 10'x10' square, with one corner cut off at 45 degrees

Here we see the foundation of cinderblock, the 2x6 joist arrangement, 
and peeking at the edges you can probably see skids.


The decking is on!


My new tablesaw.  CoffeeGoddess bought me this for Christmas 2 years ago.  This is the first time its been used!

Studs get mitered to 22.5 degrees for the angled walls where the one corner has been 
cut off the 10'x10' square the shed would otherwise be.

Making... something.  on Jacks new router.

They interlock, thusly.

Muttins, for the window Jack is making!

Window inner box, muttins laid on for show.

A wall, being constructed, with a hole for the window.

A stack of walls.  on top is the "front" wall, where a double door will go, 
which Jack is also making.  
No really.

First strip of Cedar siding

The back wall, siding complete except for the final strip, which must be ripped.


More to come!